프로젝트: br4c3/8bit-computer
8-bit Computer는 Python으로 만든 8-bit computer simulator이다. 일반적인 CPU emulator처럼 instruction set을 먼저 만들고 내부 동작을 추상화하는 방식이 아니라, logic gate, ALU, D flip-flop, register, RAM, bus, instruction decoder를 쌓아 올려 CPU 실행 흐름을 구성한다.
이미지 출처: 8bit-computer docs/full-system-demo.gif
핵심은 다음 문장으로 정리할 수 있다.
CPU를 black box로 보지 않고,
digital circuit 구성 요소가 연결된 실행 장치로 관찰하는 simulator
구현은 크게 다음 파일 두 개가 중심이다.
| 파일 | 역할 |
|---|---|
src/8bit_computer.py | 기본 8-bit CPU, RAM, bus, ALU, 7-segment output simulator |
src/8bit_computer_graphic.py | 기본 CPU 구조에 8x8 graphic display와 512-byte RAM view를 추가한 variant |
두 파일 모두 구조는 비슷하다.
logic gate 함수
  -> ALU 함수
  -> D flip-flop update 함수
  -> bit/int 변환 함수
  -> assembly parser
  -> CPU class
  -> Pygame runtime loop
프로젝트 목적
컴퓨터 구조를 공부할 때 CPU는 보통 다음 흐름으로 설명된다.
instruction fetch -> decode -> execute
하지만 실제로는 이 흐름 아래에 많은 hardware concept이 있다.
logic gate
adder
ALU
flip-flop
register
bus
RAM
decoder
clock
이 프로젝트는 그 요소들을 software로 직접 모델링한다.
그래서 단순히 ADD instruction이 실행된다는 사실만 보여주는 것이 아니라, A register, B register, ALU output, flag, RAM, bus, output display가 어떻게 변하는지 시각적으로 보여준다.
빌드업 구조
프로젝트의 빌드업은 아래 순서로 이해할 수 있다.
Logic Gates
  -> Combinational Circuits
  -> Adders and ALU
  -> D Flip-Flops
  -> Registers
  -> RAM and Bus
  -> Instruction Decoder
  -> Fetch-Execute CPU
  -> 7-Segment / Graphic Display
즉 처음부터 CPU class 하나로 모든 상태를 직접 바꾸는 방식이 아니다. 먼저 논리 게이트와 ALU를 만들고, 그 위에 sequential state를 표현하는 D flip-flop과 register를 얹는다.
실제 source에서도 가장 아래 수준의 함수는 logic gate이다.
def not_gate(a):
    return 1 if a == 0 else 0

def and_gate(a, b):
    return 1 if a == 1 and b == 1 else 0

def or_gate(a, b):
    return 1 if a == 1 or b == 1 else 0

def xor_gate(a, b):
    return 1 if a != b else 0
이런 gate function을 조합해 1-bit ALU, 8-bit ALU, register update를 구성한다.
주요 구성 요소
프로젝트의 CPU는 다음 요소들로 구성된다.
| 구성 요소 | 역할 |
|---|---|
| Logic gates | boolean operation의 기본 단위 |
| ALU | 산술 연산, 뺄셈, 비교, flag 계산 |
| D flip-flop | clock edge에서 값을 latch |
| Register | PC, MAR, IR, A, B, OUT 같은 상태 저장 |
| RAM | instruction과 data 저장 |
| Bus | 8-bit 값을 register/RAM/ALU 사이에서 전달 |
| Instruction decoder | opcode를 실제 동작으로 해석 |
| Display | 7-segment output 또는 8x8 graphic output |
이 중에서 중요한 점은 register update가 단순 변수 대입이 아니라 clock transition을 따른다는 것이다.
if clock rises:
    Q = D
이 방식 덕분에 simulator가 hardware의 sequential circuit에 더 가까운 형태를 가진다.
CPU datapath
전체 datapath는 다음처럼 볼 수 있다.
Assembly Program
      |
      v
parse_program()
      |
      v
RAM -> Bus -> IR -> Decoder
      |             |
      v             v
     MAR          ALU / Control
      ^             |
      |             v
      PC        Registers -> Output
각 register의 역할은 다음과 같다.
| Register | 의미 |
|---|---|
| PC | 다음에 실행할 instruction address |
| MAR | RAM에 접근할 address |
| IR | 현재 fetch된 instruction |
| A | ALU의 주 accumulator register |
| B | ALU의 보조 operand register |
| OUT | output display로 전달되는 register |
CPU가 실행되는 동안 Pygame 화면에는 이 상태들이 계속 갱신된다. 따라서 현재 instruction이 무엇이고, bus에 어떤 값이 올라와 있으며, ALU flag가 어떻게 변했는지 확인할 수 있다.
구현 구조
코드 구조는 하나의 거대한 emulator라기보다, 작은 hardware primitive를 함수로 만들고 CPU class가 이 함수들을 조합하는 방식이다.
not_gate / and_gate / or_gate / xor_gate
  -> alu_1bit()
  -> alu_8bit()
  -> d_flip_flop_8bit_update()
  -> CPU.fetch()
  -> CPU.decode_execute()
  -> real_time_computer_simulation()
가장 낮은 수준은 gate 함수이다.
def and_gate(a, b):
    return 1 if a == 1 and b == 1 else 0
이 gate 함수들을 이용해 alu_1bit()가 만들어지고, alu_8bit()는 1-bit ALU를 8번 반복해서 8-bit 연산을 구성한다.
def alu_8bit(A, B, opcode):
    result = []
    cout = 0
    for i in range(8):
        cin = opcode[0] if i == 0 else cout
        res, cout = alu_1bit(A[i], B[i], cin, opcode, prev_b, next_b, i)
        result.append(res)
여기서 A, B, result는 integer가 아니라 bit list이다.
5 -> [1, 0, 1, 0, 0, 0, 0, 0]
이 프로젝트에서 bit list는 LSB first 방식으로 다뤄진다.
그래서 bits_to_int()는 index를 bit position으로 보고 값을 계산한다.
def bits_to_int(bits):
    return sum(bit * (2**i) for i, bit in enumerate(bits))
CPU class 상태
CPU class는 register, RAM, flag, flip-flop state를 가진다.
class CPU:
    def __init__(self, program):
        self.ram = parse_program(program)
        self.a_reg = [0] * 8
        self.b_reg = [0] * 8
        self.pc = [0] * 8
        self.ir = [0] * 8
        self.mar = [0] * 8
        self.out_reg = [0] * 8
        self.bus = [0] * 8
        self.zero = 0
        self.carry = 0
        self.greater = 0
        self.less = 0
        self.halted = False
register 값은 모두 8-bit list로 표현한다.
예를 들어 pc, ir, a_reg, bus가 모두 [0] * 8 형태로 시작한다.
흥미로운 점은 register 값과 별도로 flip-flop state를 따로 둔다는 것이다.
self.a_states = [{'Q': 0, 'prev_clock': 0} for _ in range(8)]
self.b_states = [{'Q': 0, 'prev_clock': 0} for _ in range(8)]
self.pc_states = [{'Q': 0, 'prev_clock': 0} for _ in range(8)]
즉 단순히 self.a_reg = value로 바로 바꾸는 것이 아니라, d_flip_flop_8bit_update()를 거쳐 clock edge에서 값이 latch되는 구조를 흉내 낸다.
D flip-flop 구현
register update는 다음 함수가 담당한다.
def d_flip_flop_8bit_update(D_bits, clock, states):
    Q_bits = []
    Q_bar_bits = []
    for i in range(8):
        prev_clock = states[i].get('prev_clock', 0)
        rising_edge = clock == 1 and prev_clock == 0
        if rising_edge:
            states[i]['Q'] = D_bits[i]
        states[i]['prev_clock'] = clock
        Q_bits.append(states[i]['Q'])
        Q_bar_bits.append(not_gate(states[i]['Q']))
    return Q_bits, Q_bar_bits, states
핵심은 rising_edge 조건이다.
rising_edge = clock == 1 and prev_clock == 0
clock이 0에서 1로 바뀌는 순간에만 Q가 D를 따라간다.
이 때문에 register 값은 매 순간 즉시 바뀌는 것이 아니라 clock transition에 맞춰 바뀐다.
이 구현 덕분에 simulator가 단순 상태 머신보다 hardware timing에 가까운 느낌을 가진다.
Assembly parser
사용자는 assembly처럼 instruction을 작성한다.
LDA 10; CMP 11; JNE 6; OUT; HLT
parse_program()은 이 문자열을 semicolon 기준으로 나누고, mnemonic을 opcode로 바꾼 뒤 RAM에 저장한다.
op_map = {
    "NOP": 0b0000,
    "LDA": 0b0001,
    "STA": 0b0010,
    "ADD": 0b0011,
    "SUB": 0b0100,
    "OUT": 0b0101,
    "JMP": 0b0110,
    "HLT": 0b0111,
    "CMP": 0b1000,
    "JE": 0b1001,
    "JNE": 0b1010,
}
base simulator에서는 instruction을 한 byte로 encode한다.
ram[addr] = (opcode << 4) | arg
즉 상위 4 bit는 opcode, 하위 4 bit는 operand이다.
opcode << 4
operand
opcode + operand -> 1 byte instruction
Instruction encoding
base simulator는 instruction 하나를 1 byte로 표현한다.
bits 7-4: opcode
bits 3-0: operand
예를 들어 다음 assembly instruction을 보자.
LDA 10
이 instruction은 다음처럼 해석된다.
0001 1010
---- ----
 LDA   10
앞 4 bit는 opcode이고, 뒤 4 bit는 operand이다. 여기서 operand는 보통 RAM address를 의미한다.
LDA 10
 |  |
 |  +-- operand: RAM address 10
 +----- opcode: load RAM into A register
Instruction set
프로젝트에서 사용하는 주요 instruction은 다음과 같다.
| Mnemonic | 의미 |
|---|---|
NOP | 아무 작업도 하지 않음 |
LDA | RAM 값을 A register로 load |
STA | A register 값을 RAM에 store |
ADD | RAM 값을 A에 더함 |
SUB | RAM 값을 A에서 뺌 |
OUT | A register 값을 output register로 복사 |
JMP | program counter를 특정 address로 변경 |
HLT | simulation 중지 |
CMP | A와 RAM 값을 비교하고 flag update |
JE | zero flag가 설정되어 있으면 jump |
JNE | zero flag가 설정되어 있지 않으면 jump |
STG | graphic simulator에서 A 값을 graphic RAM에 저장 |
base simulator는 operand를 4 bit로 다루기 때문에 address 범위가 작다. graphic simulator는 더 넓은 RAM address를 다루기 위해 확장된 instruction layout을 사용한다.
실행 예시
base simulator의 예시 program은 다음과 같다.
LDA 10;
CMP 11;
JNE 6;
LDA 12;
OUT;
HLT;
LDA 13;
OUT;
HLT
RAM에는 다음 값이 미리 들어간다.
| Address | Value | 의미 |
|---|---|---|
10 | 5 | 비교할 첫 번째 값 |
11 | 3 | 비교할 두 번째 값 |
12 | 8 | 값이 같을 때 출력 |
13 | 9 | 값이 다를 때 출력 |
실행 흐름은 다음과 같다.
LDA 10으로RAM[10]의 값5를 A register에 넣는다.CMP 11로 A register 값5와RAM[11]의 값3을 비교한다.- 두 값이 다르므로 zero flag는 설정되지 않는다.
JNE 6이 실행되어 address6으로 jump한다.LDA 13으로9를 A register에 넣는다.OUT으로 output register에9를 복사한다.- display는
9를 보여준다.
즉 이 program은 조건 분기와 output을 함께 보여주는 작은 예시이다.
Fetch-execute cycle
runtime 문서 기준으로 simulator는 Pygame loop 안에서 CPU cycle을 진행한다.
흐름은 다음과 같다.
parse_program()
  -> RAM에 instruction encode
  -> CPU(program) 초기화
  -> Pygame event loop 시작
  -> clock cycle마다 fetch/execute 진행
  -> 화면 redraw
fetch phase는 instruction을 가져오는 단계이다.
PC -> MAR -> RAM -> Bus -> IR
PC = PC + 1
execute phase는 IR에 들어 있는 instruction을 decode하고 실제 상태를 변경한다.
| Instruction family | 효과 |
|---|---|
| load/store | RAM과 register 사이의 값 이동 |
| arithmetic | RAM 값을 B로 가져와 ALU 실행 |
| compare | flag update |
| branch | PC 변경 |
| output | A를 OUT register로 복사 |
| halt | simulation loop 중지 |
fetch 구현
CPU.fetch()는 현재 PC가 가리키는 RAM address에서 instruction을 읽어 IR에 넣는다.
단순화하면 다음 흐름이다.
def fetch(self, sim_clock):
    self.mar, _, self.mar_states = d_flip_flop_8bit_update(
        self.pc,
        sim_clock,
        self.mar_states,
    )

    addr = bits_to_int(self.mar)
    instr = self.ram[addr]
    self.bus = int_to_bits_8(instr)

    self.ir, _, self.ir_states = d_flip_flop_8bit_update(
        self.bus,
        sim_clock,
        self.ir_states,
    )

    pc_val = bits_to_int(self.pc)
    new_pc = int_to_bits_8((pc_val + 1) % 256)
    self.pc, _, self.pc_states = d_flip_flop_8bit_update(
        new_pc,
        sim_clock,
        self.pc_states,
    )
이 코드는 CPU datapath로 보면 다음과 같다.
PC -> MAR
RAM[MAR] -> Bus
Bus -> IR
PC + 1 -> PC
중요한 점은 이 모든 register update가 d_flip_flop_8bit_update()를 통해 이루어진다는 것이다.
즉 fetch phase에서도 PC, MAR, IR은 rising edge 기반으로 갱신된다.
decode_execute 구현
decode_execute()는 IR에서 opcode와 operand를 분리한 뒤 opcode 이름에 따라 분기한다.
base simulator에서는 IR 8 bit를 다음처럼 나눈다.
opcode = self.ir[4:]
operand = bits_to_int(self.ir[0:4])
op_name = opcode_to_name(opcode)
이 프로젝트의 bit list가 LSB first이기 때문에 slicing이 직관적인 문자열 bit order와 반대로 보일 수 있다. 그래도 encoding 기준으로 보면 상위 4 bit가 opcode, 하위 4 bit가 operand이다.
LDA 구현은 다음 흐름이다.
elif op_name == "LDA":
    self.mar, _, self.mar_states = d_flip_flop_8bit_update(
        int_to_bits_8(operand),
        sim_clock,
        self.mar_states,
    )
    addr = bits_to_int(self.mar)
    self.bus = int_to_bits_8(self.ram[addr])
    self.a_reg, _, self.a_states = d_flip_flop_8bit_update(
        self.bus,
        sim_clock,
        self.a_states,
    )
datapath로 보면 다음이다.
operand -> MAR
RAM[MAR] -> Bus
Bus -> A
ADD와 SUB는 RAM 값을 B register로 가져온 뒤 ALU를 실행한다.
elif op_name == "ADD" or op_name == "SUB":
    self.bus = int_to_bits_8(self.ram[addr])
    self.b_reg, _, self.b_states = d_flip_flop_8bit_update(
        self.bus,
        sim_clock,
        self.b_states,
    )

    alu_opcode = [0, 0, 0] if op_name == "ADD" else [1, 0, 0]
    result, self.carry, self.zero, self.greater, self.less = alu_8bit(
        self.a_reg,
        self.b_reg,
        alu_opcode,
    )

    self.a_reg, _, self.a_states = d_flip_flop_8bit_update(
        result,
        sim_clock,
        self.a_states,
    )
이 구현에서 ALU는 단순히 값을 반환하는 함수지만, 결과를 register에 반영할 때는 다시 D flip-flop update를 거친다.
branch 구현
조건 분기는 flag와 PC update로 구현된다.
CMP는 A register와 RAM 값을 비교하고 flag를 갱신한다.
elif op_name == "CMP":
    self.bus = int_to_bits_8(self.ram[addr])
    self.b_reg, _, self.b_states = d_flip_flop_8bit_update(
        self.bus,
        sim_clock,
        self.b_states,
    )
    _, _, self.zero, self.greater, self.less = alu_8bit(
        self.a_reg,
        self.b_reg,
        [0, 1, 1],
    )
JNE는 zero flag가 0이면 PC를 operand로 바꾼다.
elif op_name == "JNE":
    if self.zero == 0:
        new_pc = int_to_bits_8(operand)
        self.pc, _, self.pc_states = d_flip_flop_8bit_update(
            new_pc,
            sim_clock,
            self.pc_states,
        )
즉 branch는 특별한 magic이 아니라 다음 한 줄로 요약된다.
condition flag를 보고 PC register에 새 address를 latch한다.
Pygame runtime loop 구현
real_time_computer_simulation()은 CPU를 실행하고 화면을 그리는 runtime이다.
역할은 세 가지이다.
- keyboard event 처리
- simulated clock toggle
- CPU state rendering
clock은 실제 시간이 일정 시간 지났을 때 0과 1을 번갈아 바꾼다.
if current_ticks - cycle_start_ticks >= current_cycle_duration / 2:
    sim_clock = 1 - sim_clock
    cycle_start_ticks = current_ticks
clock이 1이 되는 순간 fetch와 execute를 번갈아 수행한다.
if sim_clock == 1:
    cycle_count += 1
    if fetch_phase:
        cpu.fetch(sim_clock)
        fetch_phase = False
    else:
        cpu.decode_execute(sim_clock, cycle_count)
        fetch_phase = True
이 구조 때문에 한 cycle마다 fetch와 execute가 교대로 일어난다.
rising edge 1 -> fetch
rising edge 2 -> execute
rising edge 3 -> fetch
rising edge 4 -> execute
clock이 0으로 내려갈 때는 각 flip-flop state의 prev_clock을 0으로 되돌린다.
그래야 다음 0 -> 1 transition에서 다시 rising edge를 감지할 수 있다.
if sim_clock == 0:
    for reg_states in [cpu.a_states, cpu.b_states, cpu.out_states, cpu.pc_states, cpu.mar_states, cpu.ir_states]:
        for bit_state in reg_states:
            bit_state['prev_clock'] = 0
화면 렌더링 구현
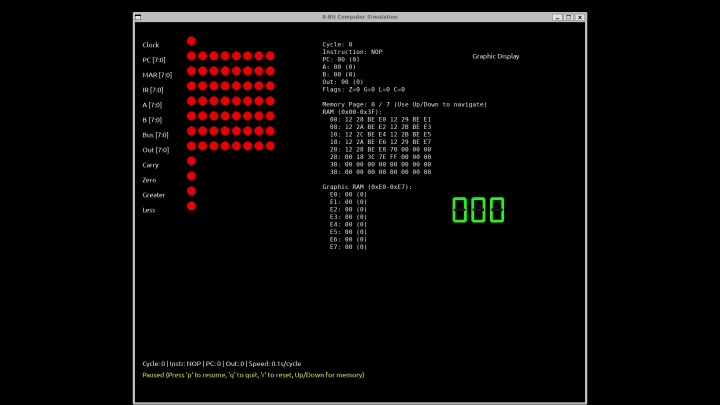
Pygame 화면은 CPU 내부 상태를 LED처럼 보여준다.
labels = [
    "Clock",
    "PC [7:0]",
    "MAR [7:0]",
    "IR [7:0]",
    "A [7:0]",
    "B [7:0]",
    "Bus [7:0]",
    "Out [7:0]",
    "Carry",
    "Zero",
    "Greater",
    "Less",
]
각 label에 따라 CPU state에서 bit를 읽고, 1이면 초록색, 0이면 빨간색으로 그린다.
color = GREEN if state == 1 else RED
pygame.draw.circle(screen, color, (x, y), led_radius)
7-segment display는 output register 값을 decimal로 바꾼 뒤 세 자리로 나눠 그린다.
out_decimal = bits_to_int(cpu.out_reg)
draw_7_segment(screen, out_decimal // 100, 700, 500, scale=1.5)
draw_7_segment(screen, (out_decimal // 10) % 10, 750, 500, scale=1.5)
draw_7_segment(screen, out_decimal % 10, 800, 500, scale=1.5)
따라서 UI는 단순 decorative display가 아니라 CPU state inspector 역할을 한다.
8-bit ALU
ALU는 A/B 입력과 opcode를 받아 결과와 flag를 만든다. source에는 1-bit ALU와 8-bit ALU가 나뉘어 있다.
def alu_8bit(A, B, opcode):
    result = []
    cout = 0
    for i in range(8):
        prev_b = B[i-1] if i > 0 else 0
        next_b = B[i+1] if i < 7 else 0
        cin = opcode[0] if i == 0 else cout
        res, cout = alu_1bit(A[i], B[i], cin, opcode, prev_b, next_b, i)
        result.append(res)
    zero = 0 if any(result) else 1
    a_int = bits_to_int(A)
    b_int = bits_to_int(B)
    greater = 1 if a_int > b_int else 0
    less = 1 if a_int < b_int else 0
    return result, cout, zero, greater, less
여기서 볼 수 있는 flag는 다음과 같다.
| Flag | 의미 |
|---|---|
| Carry | 덧셈/뺄셈에서 carry 또는 borrow 계열 상태 |
| Zero | 결과가 0인지 여부 |
| Greater | A가 B보다 큰지 여부 |
| Less | A가 B보다 작은지 여부 |
분기 instruction인 JE, JNE는 이런 flag를 기준으로 PC를 바꾼다.
Graphic display variant
src/8bit_computer_graphic.py는 base CPU model에 8x8 graphic display를 추가한 variant이다.
graphic RAM은 특정 RAM address 영역을 화면 pixel로 해석한다.
Graphic RAM 0xE0-0xE7
      |
      v
8 bytes, one row per byte
      |
      v
8x8 pixel display
각 byte의 bit가 pixel 하나에 대응된다. 예를 들어 다음 byte pattern은 한 줄의 pixel row가 된다.
00111100
graphic simulator는 STG instruction을 사용해 A register 값을 graphic RAM에 저장한다.
LDA 44; STG 228;
이 흐름은 CPU instruction이 단순 숫자 output을 넘어 memory-mapped display로 확장되는 구조를 보여준다.
graphic simulator 구현 차이
8bit_computer_graphic.py는 base simulator와 대부분 같은 구조를 공유하지만, instruction encoding과 RAM 크기가 다르다.
base simulator는 4-bit operand만 사용한다.
1 byte instruction = 4-bit opcode + 4-bit operand
graphic simulator는 더 큰 address를 다루기 위해 instruction을 2 byte로 저장한다.
ram[addr] = (opcode << 4) | ((operand >> 4) & 0x0F)
ram[addr + 1] = operand & 0xFF
addr += 2
fetch에서는 PC가 instruction index처럼 쓰이고, 실제 RAM address는 PC * 2로 계산한다.
addr = bits_to_int(self.mar) * 2
high_byte = self.ram[addr]
low_byte = self.ram[addr + 1]
instr = (high_byte << 8) | low_byte
self.full_instr = instr
execute 단계에서는 full_instr에서 8-bit operand를 복원한다.
operand = ((self.full_instr >> 4) & 0x0F) << 4 | (self.full_instr & 0xFF)
이렇게 한 이유는 graphic RAM이 0xE0 같은 큰 address를 사용하기 때문이다.
4-bit operand로는 0x0부터 0xF까지만 표현할 수 있으므로 display memory address를 지정할 수 없다.
STG와 memory-mapped display
graphic simulator의 핵심 instruction은 STG이다.
STG는 A register 값을 operand address의 RAM에 저장한다.
elif op_name == "STG":
    self.mar, _, self.mar_states = d_flip_flop_8bit_update(
        int_to_bits_8(operand),
        sim_clock,
        self.mar_states,
    )
    addr = bits_to_int(self.mar)
    self.bus = self.a_reg[:]
    self.ram[addr] = bits_to_int(self.bus) & 0xFF
graphic display는 0xE0부터 시작하는 RAM 8 byte를 읽어 화면에 그린다.
graphic_start_addr = 224 # 0xE0
렌더링은 row마다 RAM byte 하나를 읽고, 각 bit를 pixel로 바꾼다.
for row in range(graphic_height):
    addr = graphic_start_addr + row
    byte = cpu.ram[addr]
    row_bits = int_to_bits_8(byte)

    for col in range(graphic_width):
        pixel = row_bits[7 - col]
        color = WHITE if pixel == 1 else BLACK
        pygame.draw.rect(screen, color, (...))
즉 display는 별도 객체가 아니라 RAM의 특정 영역을 해석한 결과이다. 이 구조는 memory-mapped I/O의 작은 예시로 볼 수 있다.
CPU가 RAM[0xE0]에 값을 쓴다.
화면은 RAM[0xE0]을 pixel row로 해석한다.
실행 방법
Ubuntu 22.04 기준 필요한 system package는 다음과 같다.
sudo apt update
sudo apt install -y python3 python3-venv python3-pip graphviz \
  libsdl2-dev libsdl2-image-dev libsdl2-mixer-dev libsdl2-ttf-dev
Python 가상환경을 만들고 dependency를 설치한다.
python3 -m venv .venv
source .venv/bin/activate
pip install -r requirements.txt
base CPU simulator 실행:
python src/8bit_computer.py
graphic display simulator 실행:
python src/8bit_computer_graphic.py
주요 control은 다음과 같다.
| Key | 동작 |
|---|---|
p | pause/resume |
r | reset |
q | quit |
+ | clock을 느리게 |
- | clock을 빠르게 |
Up / Down | graphic simulator에서 memory page 이동 |
프로젝트 구조
repository 구조는 다음과 같다.
8bit-computer/
├── src/
│   ├── 8bit_computer.py
│   └── 8bit_computer_graphic.py
├── notebooks/
│   ├── circuit.ipynb
│   └── circuit_test.ipynb
├── docs/
│   ├── architecture.md
│   ├── runtime.md
│   ├── instruction_set.md
│   ├── full-system-demo.gif
│   ├── alu-test.gif
│   ├── alu-offset-visualization.png
│   └── d-flip-flop-oscilloscope.png
├── requirements.txt
├── README.md
└── LICENSE
문서가 architecture, runtime, instruction_set으로 나뉘어 있는 점이 좋다.
단순히 실행 방법만 적은 README가 아니라, CPU가 어떻게 구성되고 instruction이 어떻게 동작하는지 별도 문서로 분리되어 있다.
이 프로젝트에서 배울 수 있는 것
이 프로젝트는 다음 개념을 한 번에 연결해서 볼 수 있다.
| 개념 | 배울 수 있는 점 |
|---|---|
| Logic gate | CPU 구성의 가장 작은 연산 단위 |
| ALU | 산술 연산과 flag 생성 방식 |
| D flip-flop | clock edge 기반 상태 저장 |
| Register | CPU 내부 상태가 유지되는 방식 |
| RAM | instruction과 data가 같은 memory에 놓이는 구조 |
| Bus | 여러 장치 사이의 값 이동 |
| Opcode | binary instruction이 실제 동작으로 해석되는 방식 |
| Branch | flag와 PC 변경으로 조건 분기를 만드는 방식 |
| Display | output register 또는 memory-mapped display 개념 |
특히 좋은 점은 CPU 내부 상태가 화면에 보인다는 것이다. 컴퓨터 구조를 책으로만 보면 PC, MAR, IR, bus 같은 용어가 추상적으로 느껴질 수 있다. 이 프로젝트는 그 값들이 clock에 따라 어떻게 변하는지 보여준다.
정리
8bit-computer는 Python과 Pygame으로 만든 hardware-first 8-bit computer simulator이다.
구현 관점에서는 작은 logic 함수들을 조합하고, CPU class가 RAM/register/bus/flag를 관리하며, Pygame loop가 clock과 rendering을 담당하는 구조이다.
핵심은 다음과 같다.
- logic gate부터 CPU 실행까지 bottom-up으로 구성한다.
- 8-bit ALU, D flip-flop, register, RAM, bus를 명시적으로 모델링한다.
- assembly program을 parse해서 RAM에 instruction으로 저장한다.
CPU.fetch()는PC -> MAR -> RAM -> Bus -> IR흐름을 구현한다.CPU.decode_execute()는 opcode별로 register/RAM/ALU/PC를 갱신한다.- register update는 rising-edge D flip-flop 방식으로 처리한다.
- Pygame loop는 clock을 toggle하고 fetch/execute phase를 번갈아 실행한다.
- base simulator는 7-segment output을 사용한다.
- graphic simulator는 2-byte instruction과 8x8 memory-mapped display를 보여준다.
단순 CPU emulator가 아니라, CPU를 구성하는 digital circuit concept을 학습하기 위한 시각적 실험장에 가깝다.